How To Use ClickUp For Project Management | Guide To Organize Your Business20 min read
Organize your business and get it out of your head by learning how to use ClickUp for project management.
When I first jumped on the ClickUp train, I literally spent hours one Friday night watching every single YouTube tutorial out there about how to use ClickUp for project management. I remember feeling SO excited about all the features it had and eager AF to get it set up and working in my business so that I could finally feel organized and on top of things. As an entrepreneur running a 6 figure business on 20 hours a week with 2 kids at home, ClickUp basically saved my sanity.
Until it came time to actually set my ClickUp up… and I was immediately overwhelmed. There are just so many OPTIONS for how you can do just about anything, from custom statuses to fields to views to dashboards… What was once exciting now became a big *ss project and took me weeks to implement.
But I’m so glad I did, because now that I figured out how to use ClickUp for project management and set it up exactly how I want it in my business, I can never go back to any other project management software for small business owners.
I want you to love ClickUp as much as I do so I’m going to break down exactly how to structure your ClickUp account so that you can organize your business without the overwhelm I felt.
The structure I’ll share in this article can be applied to any small business but is targeted specifically for service based entrepreneurs.
So, if you’re ready to figure out how to use ClickUp for project management in your small business, you’ll walk away from this article knowing exactly:
- What Spaces, Folders, and Lists to set up in ClickUp
- How to visualize your goals in ClickUp
- How to organize projects in ClickUp
- How to keep track of client information in ClickUp
- How to document SOPs (standard operating procedures) in ClickUp
- How to organize your content marketing in ClickUp
- How to organize your team’s tasks in ClickUp
- How to organize ideas in ClickUp
- How to keep track of issues in ClickUp
- How to organize documents in ClickUp
- Daily, weekly, and monthly processes to use ClickUp to help you organize your business
In this blog post I talk about why ClickUp is the best project management software for small business owners. If you use one of our affiliate links to join ClickUp, we’ll receive a tiny kick-back at no extra cost to you. And before you think that I wrote this blog post just to get pocket change from ClickUp, let me tell you that this entire post was written & published before I even thought about becoming affiliated with ClickUp, I truly just love the platform so much.
How To Organize Your Business In ClickUp
Sign Up For ClickUp
First step in how to use ClickUp for project management is to sign up for ClickUp if you haven’t done so already. If you’re not sure whether ClickUp is the right project management software for you, read our article on The Best Project Management Software for Small Business Owners to find out what’s right for you.
Determine Your Structure
First, you need to decide your hierarchy and how you will visualize projects. ClickUp has a unique structure in that tasks live inside of lists, lists can live inside of folders, and folders live inside of Spaces.
I recommend setting projects up as tasks (rather than lists) for 2 reasons.
- Tasks have subtasks, so you will easily be able to break out your projects into multiple steps this way.
- It’s much easier to visualize multiple projects at once if you’re using tasks not lists.
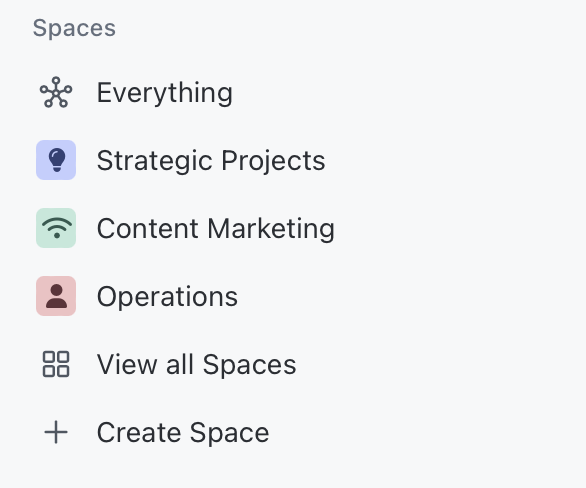
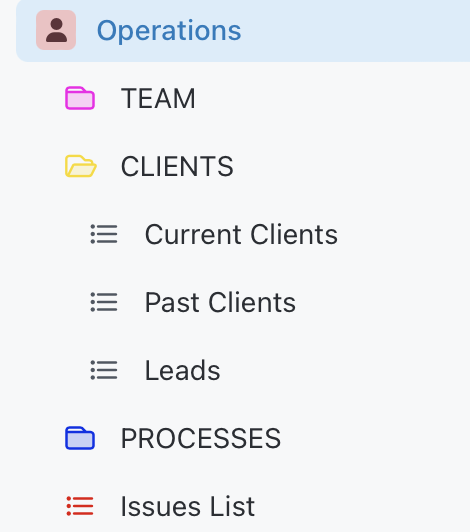
Second, you’ll want to determine what your Spaces are. For a typical service based business or online business, I recommend setting up 3 spaces:
- Strategic Projects: this is where your main list of projects and priorities will be
- Content Marketing: this is where you can house everything to do with marketing
- Operations: this will house your SOPs and Client info
Here’s what these spaces look like in my ClickUp account:
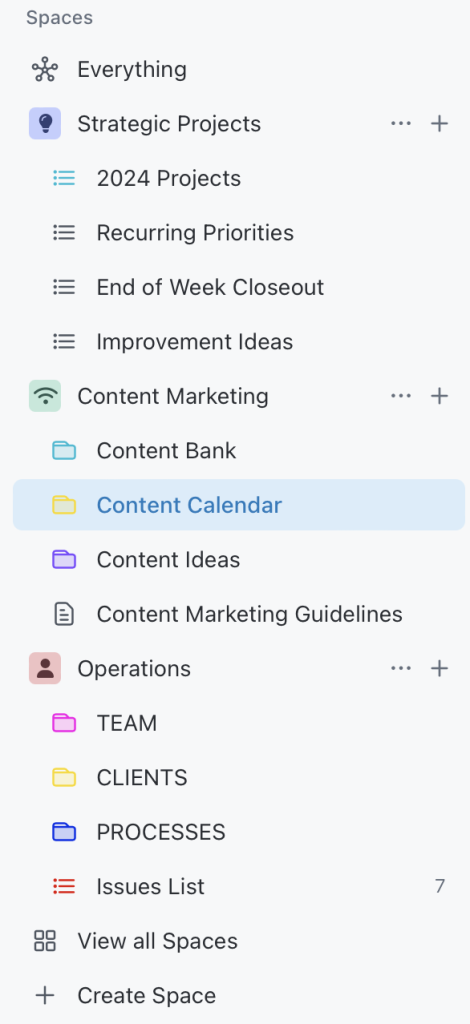
Thirdly, decide whether or not you want to use folders.
Folders allow you to group multiple lists together, while separating them from other folders/lists in that same space. I have a clients folder in my operations space, which houses 3 lists that I want to keep separate from the processes folder in that same space. You can always add lists to folders later so you don’t need to decide this right now but it is a handy feature to keep in mind.
Here’s how the folders look inside of my spaces:
How To Visualize Your Goals In ClickUp
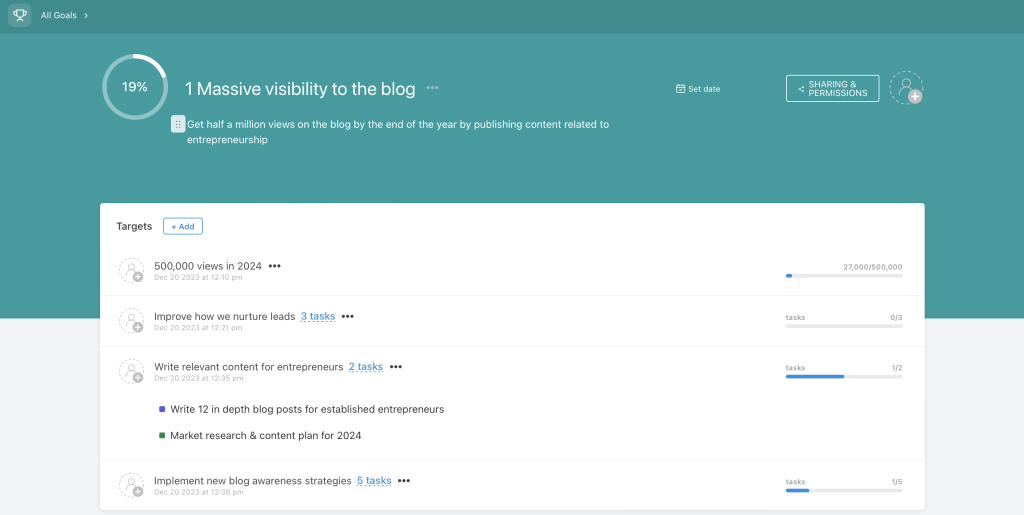
The high level goals you have for your business this year can be set up in the Goals section of ClickUp. Here’s what it looks like:

Decide what the top 3-5 things are that you’re focusing on this year and set those up in the Goals section on the left side of your ClickUp navigation bar.
Once your goals are set up, you can link your specific lists and tasks that relate to that goal so that you can clearly visualize your progress!
If you’re not clear on what your overarching goals are for your business, check out our Strategic Success Planner to help you get that clarity ASAP.
Here’s what it looks like when I click into the first goal above:
Related Post: How To Measure Your Progress On Your Personal Growth Goals
How to organize projects in ClickUp
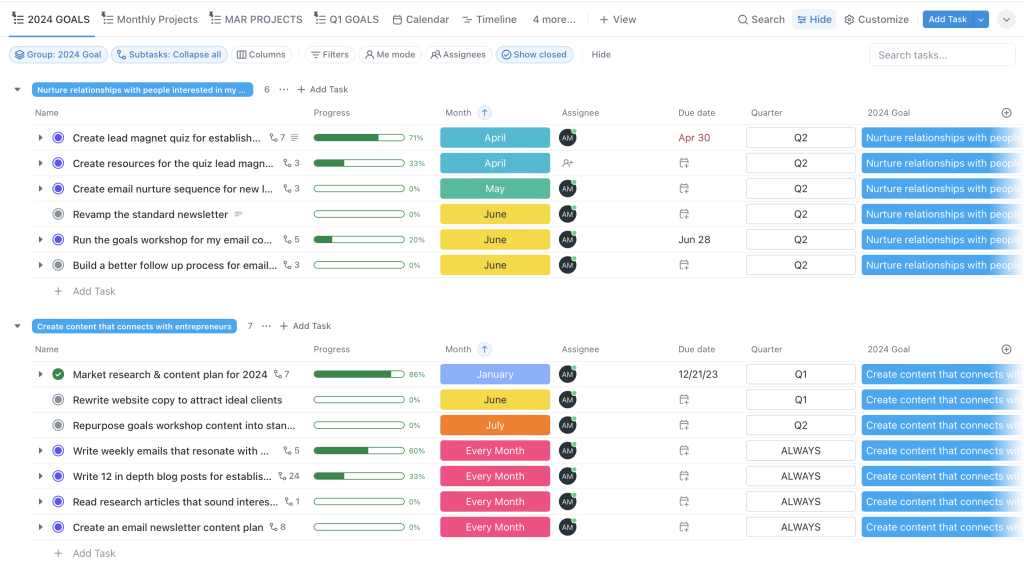
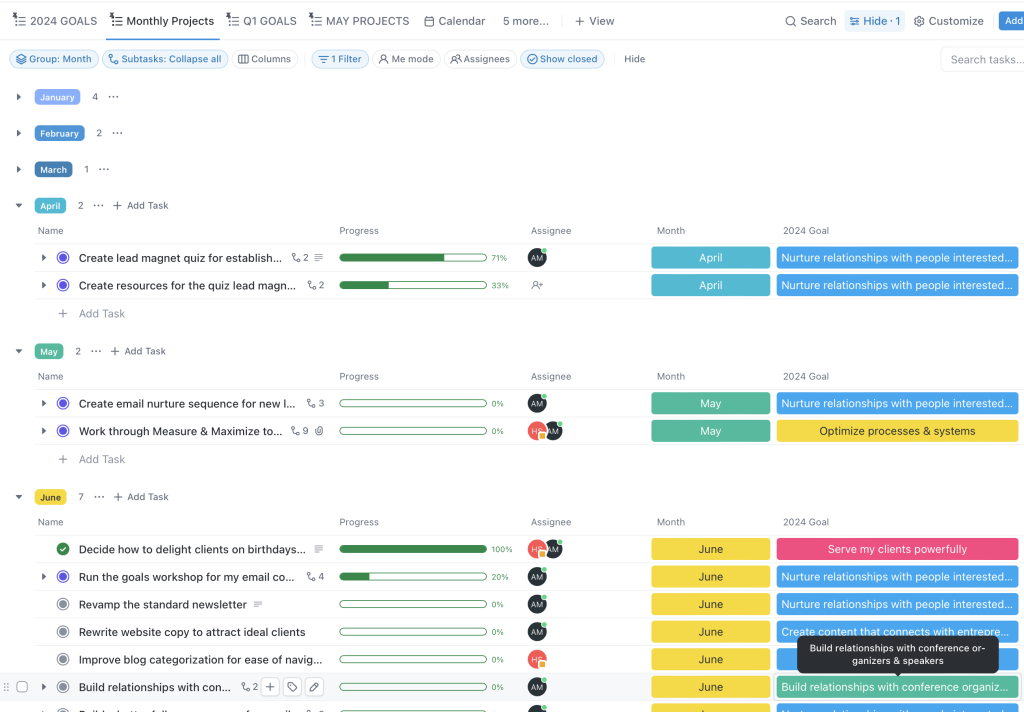
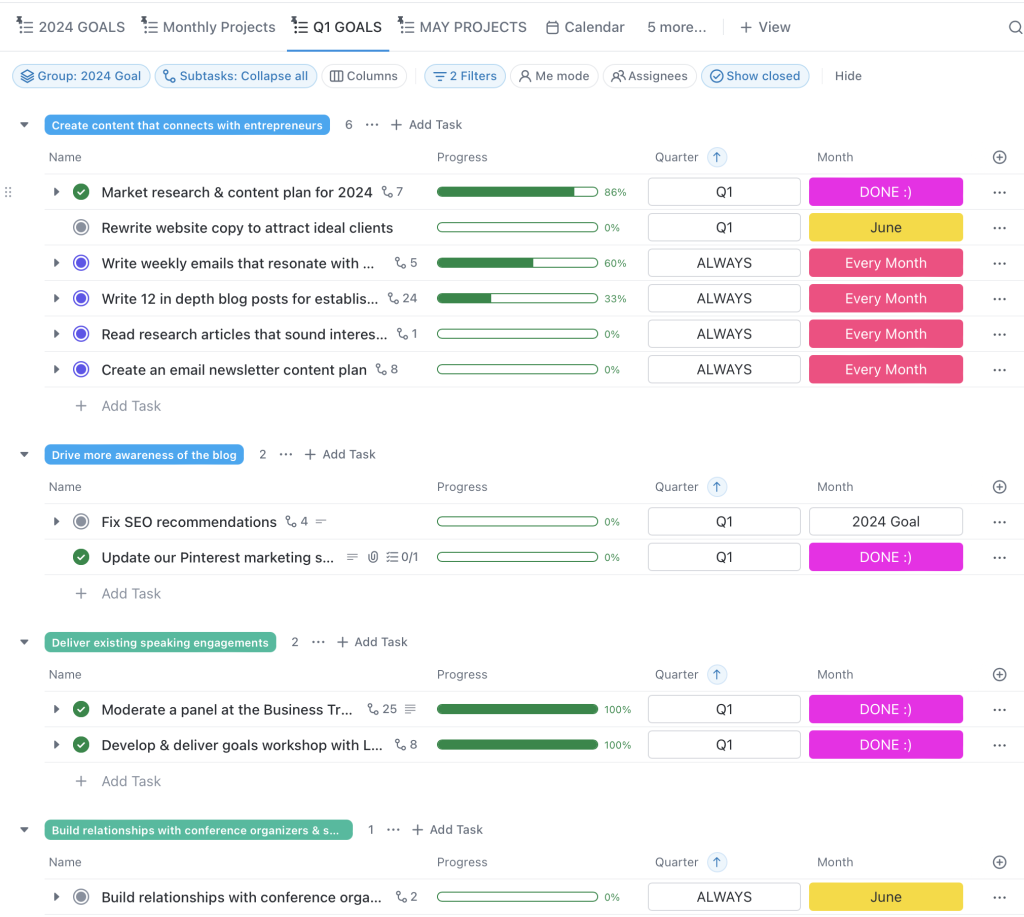
In your Strategic Projects space I would create a list called 2024 Projects, and house everything you want to accomplish this year in your business. Each project would be its own task in that list (with subtasks breaking the project down into steps). I would set up 3 custom fields to help you sort these projects
- Month: you can decide what month this project will be a priority in and then sort by that month to see everything you’ve planned to work on that month
- Quarter: same idea, but you can see things by quarter
- 2024 Goal: your projects are going to fall under higher level goals for your business. I would set up each of these goals as a custom field so that you can see what’s happening in each one.
See below how I have each custom field set up (month, quarter, and 2024 goal). This view shows everything happening in my business in 2024 (this is just a small snippet of our entire list for reference).
Then I would create a custom view (across the top) where you can view this list
- A 2024 Goals View (all tasks grouped by custom field 2024 Goal)– this allows me to see all of the projects that fall under a specific goal in my business so that I can see all the projects I’m doing to achieve a specific higher level goal.
- A Monthly Projects View (all tasks grouped by custom field Month) — this allows me to see the big projects that are happening each month so that I can make sure they are evenly distributed throughout the year and I am not overloading one specific month.
- A Quarterly Project View (all tasks grouped by custom field Quarter and filtered for whatever this quarter is) — this allows me to see all of the high level projects happening this quarter so that I can plan out my months.
- A This Month’s Projects View (grouped by custom field Month and filtered for whatever this month is) — this allows me to see just what’s happening this month so that I can plan my weeks accordingly.
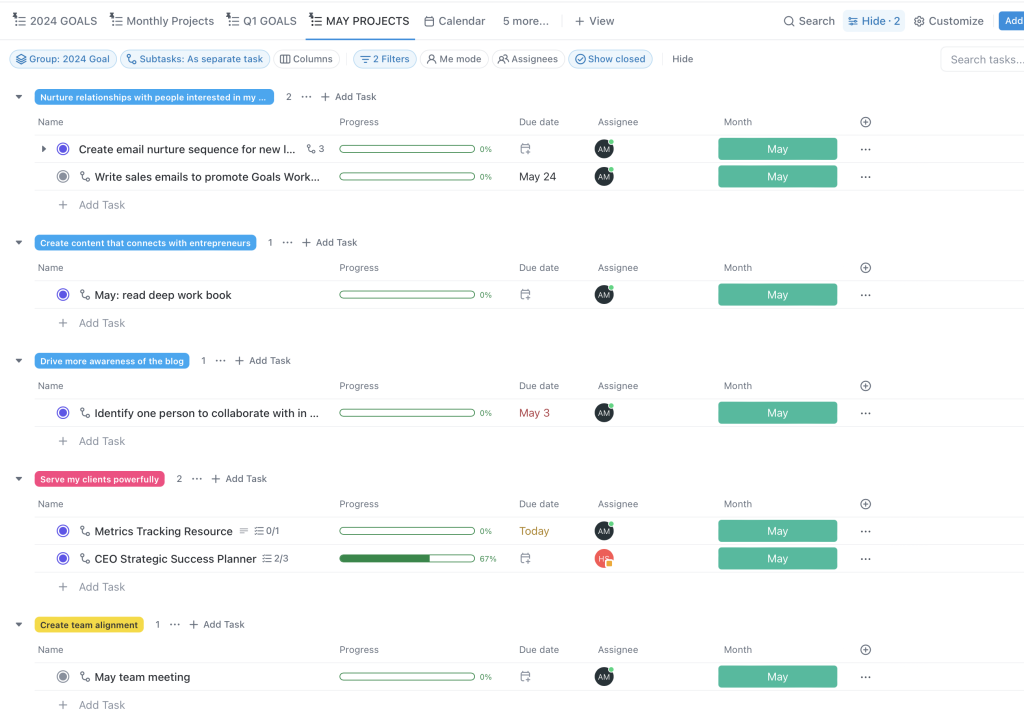
In the views, you can see that I include:
- The task (obviously)
- A progress bar — this helps me visually see the progress I’ve made on my projects
- The assignee — who is repsonsible for completing this on our team
- The due date — when it needs to be completed by
- The Month, The Quarter, and The Goal — so that I can filter my views every which way based on these custom statuses.
There are many other columns you can include in your lists but I find these are the simplest and give me exactly the information I need to make decisions and plan my weeks effectively.
How to organize client information in ClickUp
In your client space I would create 3 lists
- Current clients
- Past clients
- Prospective clients
In the current client list, you can create a task for each client, and columns to house all the information related to that client. You can document their start date, their contract end date, their contact info, their birthday, and even attach their contract or link any Google folders/docs with other information you might want to keep organized.
The past client list would be essentially a placeholder to move anyone out of the current client list that has dropped off, but keep all their info organized, allowing you to reach out to them for follow ups, to pick right back up where you left off in the future, or even to track who you worked with and for how long and use that data to make informed decisions in your business.
And the prospective clients list can act as your CRM (customer relationship management) tool. You can track notes from conversations you’ve had, when you last contacted them, when you need to follow up again, etc.
How to organize SOPs (standard operating procedures) in ClickUp
Housing all your standard operating procedures (SOPs) in one place is so important.
It allows you to use your documented SOPs when you need to remember how to do something again (like your year end process for taxes 😂).
It also allows current or future team members to reference your SOPs so that they can do quality work quickly and without endless hours of training.
In ClickUp, I started a doc called Process Management in my Operations Space and use it to keep checklists, video tutorials, or work instructions on how to do anything that is done multiple times in your business.
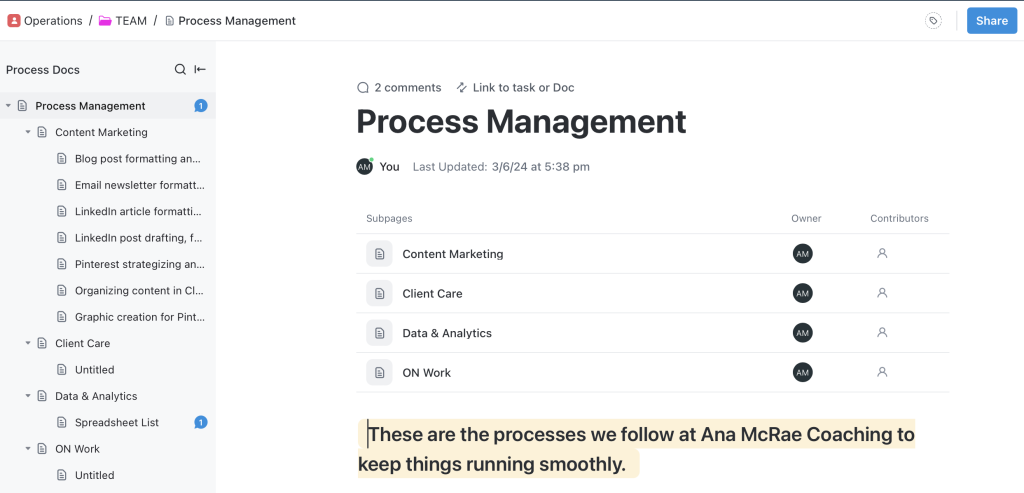
The best part is the beautiful templates that you can access in ClickUp to help you get started with creating process docs that are as pretty as they are useful!
If you’re a service provider just starting to focus on scaling your business, you probably don’t have many (or any) of your processes documented so one Doc in ClickUp to house everything should be fine. But if you’ve got multiple categories of SOPs (training SOPs, marketing SOPs, etc.) then you could create multiple docs to keep everything organized.
Related Post: How to Grow Your Business With An Exceptional Strategy
How to organize your team’s tasks in ClickUp
ClickUp is a great tool to keep you and your team aligned on priorities, and it’s also a great way for your team to visibly see what they’re responsible for doing each week.
If you are just starting out with a virtual assistant and you’re delegating tasks ad hoc (as you think of them), you can start a list under the Operations Space called “VA To Dos” and pop in anything you need your Virtual Assistant to work on for you.
If your VA or team is more integrated into your high level projects and has a regular list of recurring activities they’re responsible for integrating, it might not make sense for them to have their own list. Instead, you’ll want to assign them to projects inside your main Projects List.
How to organize documents in ClickUp
As your team and your business grows, they will be creating lots of documents for you. Having a place to organize those documents is essential.
My assistant has been building out a ton of spreadsheets to help analyze data, and all of those spreadsheets are linked in a list called Data Spreadsheets. The spreadsheets themselves exist in Google Sheets, but in order to keep everything in one place and easy to find, we’ve got them organized in ClickUp.
You can do the same, whether you have training rosters or accounting files or anything else, you can create a doc in your Operations Space and keep links or embedded files organized.
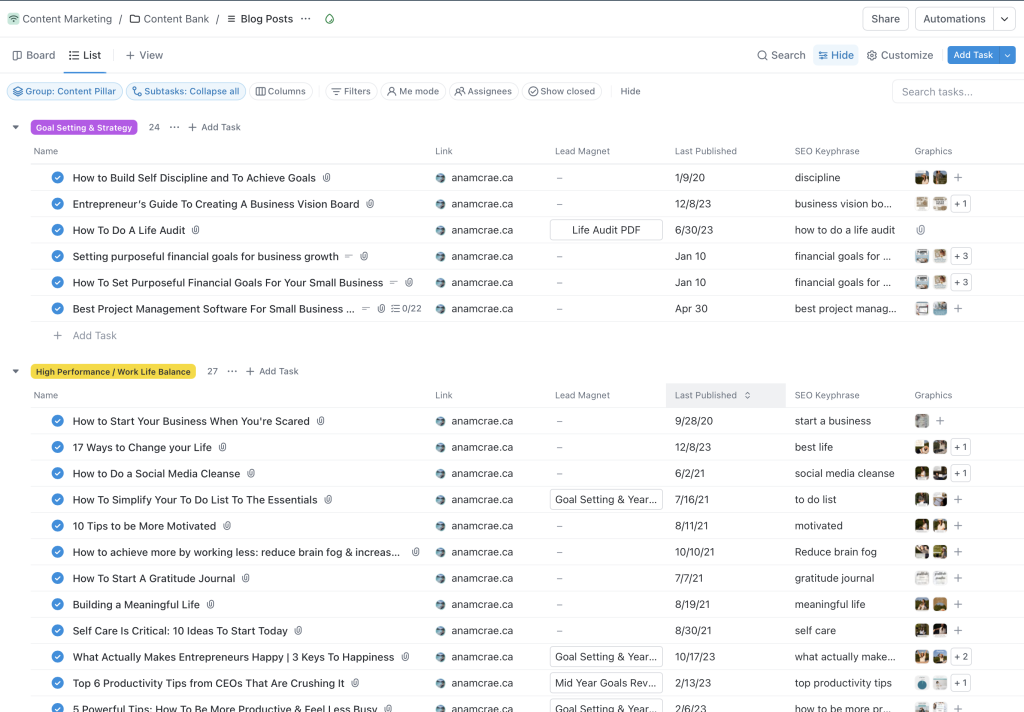
How to organize your content marketing in ClickUp
Every business is doing some form of digital marketing at this point but keeping it all organized can be an overwhelming disaster.
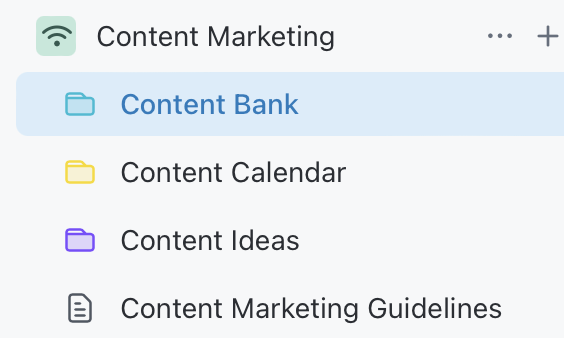
I recommend setting up a Content Marketing Space in ClickUp and creating 3 lists
- Content Plan: a list where you write out the articles or the social posts you’re going to create and when you want to publish them so that you have clear visibility to what your content marketing will look like
- Content Bank: a list where anything and everything that’s ever been published lives, so that you can repurpose content, and easily find it when you need it.
- Content Ideas: a list where you jot down the things you want to write about, so that when it comes time to write, you’re not staring at a blank screen, and you can capitalize on those “aha” moments when you didn’t quite have the time to put pen to paper
I would also recommend creating custom fields here to help you organize and sort your content, such as
- Content Type (blog post, social media, email newsletter, etc.)
- Content Pillar (to help you organize what the topic of that content is)
- Month (to sort by what needs to be published each month)
You can then have specific views or lists that show you just your blog posts, or just your email newsletters. You can also filter for content that is specific to one content pillar (like just blog posts on goal setting) or that was published in a specific month.
In terms of how to best display this visually, I would have the following fields/columns showing in each list:
- The task (the name of the piece of content)
- The link to your website where it’s published
- The date it was last published
- Graphics attached for easy repurposing
- A link to google docs where the original copy is stored
- The SEO Keyphrase you’re targeting
- the Lead Magnet you’re promoting in the blog post
This will help you keep your content bank organized for easy repurposing!
Related Post: Top 6 Productivity Tips from CEOs That Are Crushing It
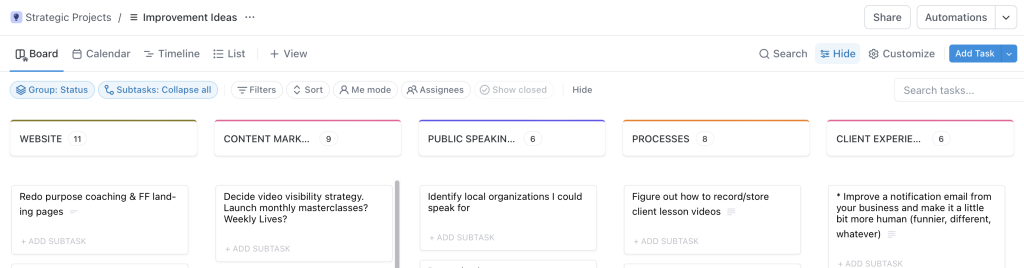
How to organize ideas in ClickUp
Under your Strategic Projects Space, create another list called Improvement Ideas.
Any time you have an idea of something you could create or improve in your business, put it here! Then, when it comes time to do a strategic review of your business, you can look at all the great ideas you had and prioritize what to focus on next.
This keeps you from forgetting about your brilliant ideas, and it also keeps you from immediately acting on them out of fear of forgetting.
I would create a custom field called Category to help you sort these ideas by category. You might have categories like:
- Resources To Create
- New Offers
- Website Improvements
- etc.
I like to view this in Board View rather than list view because I find it less overwhelming and easier to move ideas around from category to category.
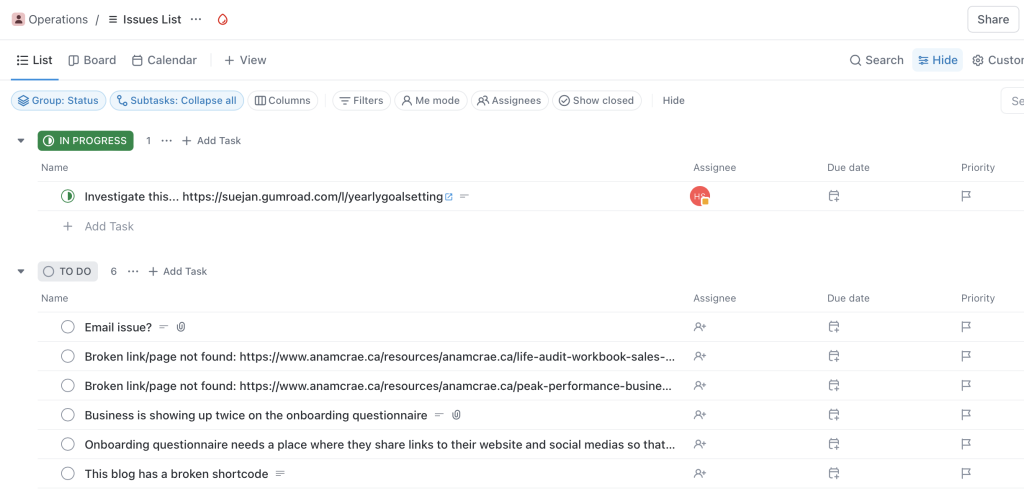
How to keep track of day to day issues in ClickUp
Sometimes things pop up that need to be dealt with but they don’t fit into a project or anyone’s specific role or maybe you just don’t have time to do them right now but you don’t want to forget about it.
Having an Issues List in Operations Space will help you have one place to quickly jot down problems that pop up in your business and assign them to someone with a deadline to fix it by.
The Issues List is one of the most valuable lists to have in your project management software because if you’re not capturing those issues somewhere, then you’re likely just fixing them immediately, and that’s taking you out of your strategic focus for the day, causing you to firefight and procrastinate on important but not urgent priorities.
So, give your brain a place to put those issues, and set up a process where you check that list and deal with the issues on a timely basis (so that you can sleep soundly at night without waking up at 2am remembering that meeting you were supposed to reschedule).
How to use ClickUp for project management ongoing
Now, let me just say that there’s no point in setting all this up if you aren’t going to use it…
Let’s talk about the process you need to put in place to get the most out of your project management software for small business owners.
Do a weekly review to plan your tasks for the week
If you’re not looking at it at least weekly, you’re not using it enough.
Look at your projects for the month & priorities for the week at the end of the week to update what you’ve accomplished, and at the start of the week to review & create your plan for where to focus.
Our Peak Performance Business Bundle includes a Weekly CEO Meeting Template that covers the key questions you need to ask yourself when planning your week in your business. Grab it here!
Do a monthly & quarterly review to plan your projects
At the end of the month, look at which of your goals for the month you accomplished, and where you need to focus now to hit your goals for the quarter. Decide where you might need to pivot or change the plan. And map out the weekly priorities to set you up for success next month.
Do the same thing at the end of the quarter – what did you accomplish? What didn’t get done and what’s the plan with it? Where do you need to focus next quarter to line you up for a successful year?
The Peak Performance Business Bundle also includes a monthly and quarterly review workbook to help you set priorities in your business.
Do an annual review to set the stage for next year
Our CEO Strategic Success Planner walks you through the exact step by step process of reflecting on your business annually and setting goals and priorities for the following year. Check it out here.
Once you’ve audited your business and reflected on your goals, you’re going to use your project management software to break everything down into manageable projects and plan out the roadmap to a successful year.
Related Post: How to do a Life Audit | Ultimate Guide
Use ClickUp daily to help you focus
Honestly, I open my ClickUp account every day. I created a custom dashboard in ClickUp that shows me the projects I’m supposed to be working on, the recurring tasks I need to remember to do, and my progress toward my goals. It keeps me grounded and focused on the right things.
Figuring out how to use ClickUp for project management can seem like an overwhelming task at first, but once you figure out your high level structure and what information you want to store, you can set it up to be exactly what you need.
I hope this article has helped you learn how to use ClickUp for project management to determine what spaces, folders, lists, and docs you can create to organize your business.
If you aren’t sure where you need to focus in your business for the upcoming year take our personalized quiz here! You’ll get a personalized report on exactly where you should focus your time and energy so that you can start getting organized and moving your goals forward!
If you’re ready to not only get organized but accomplish bigger things in your business, book a discovery call to explore how 1:1 coaching can help you with the strategy, mindset, and accountability you need to scale your business to the next level.
Related Posts: